ChatGPTにアクセスできない環境、またはChatGPTのアカウントを持っていない人にChatGPTを使ってもらうにはどうしたらいいでしょうか?
ChatGPTにはAPIもありますので、GASを使ってWebアプリを作成。
簡易のChatGPTを作ることができます。
これであればGoogleアカウントがあれば、ChatGPTが使えます。
目次
GASで動くChatGPTの作り方
UIと機能部分はGAS、ログはスプレッドシート、ChatGPTのAPIはキーを発行します。
以上で、簡易のChatGPTが作成できます。
ChatGPTのAPIキーの発行
まずはChatGPTのAPIキーの発行しましょう
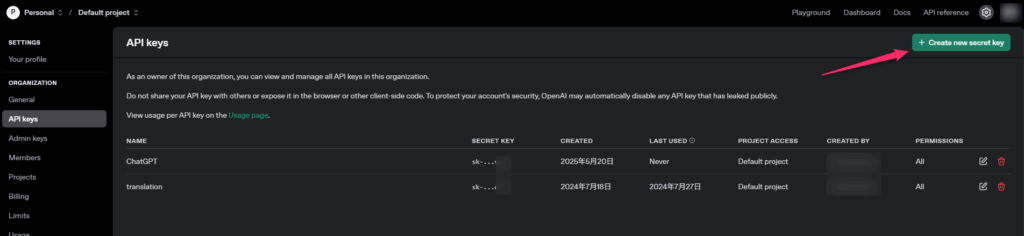
シークレットキーをメモに控えておきます。
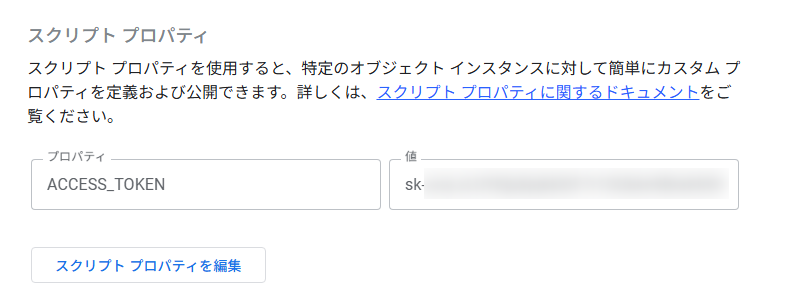
スクリプトプロパティに登録
さきほど控えたAPIのシークレットキーをGASのスクリプトプロパティに登録しましょう。
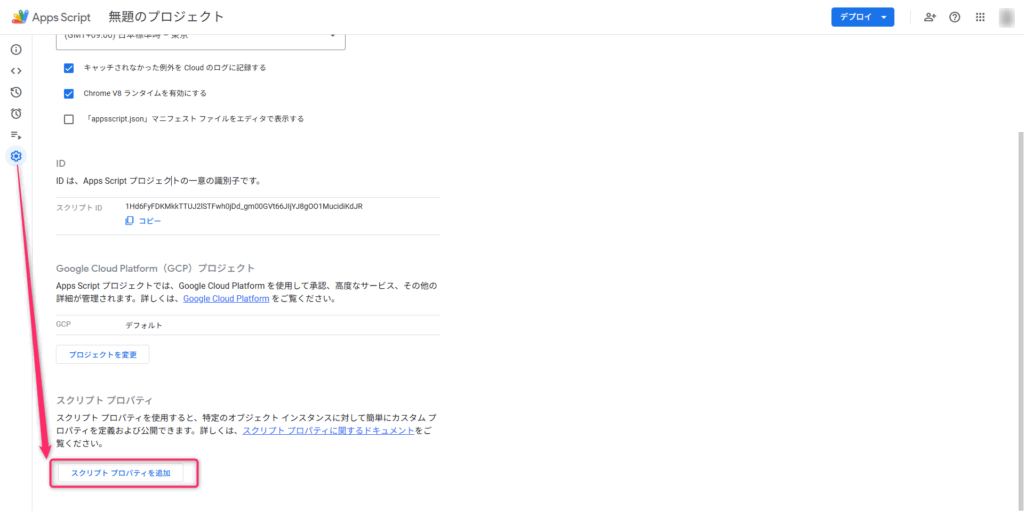
プロパティはACCESS_TOKENとしました。
値にシークレットキーを入れます。
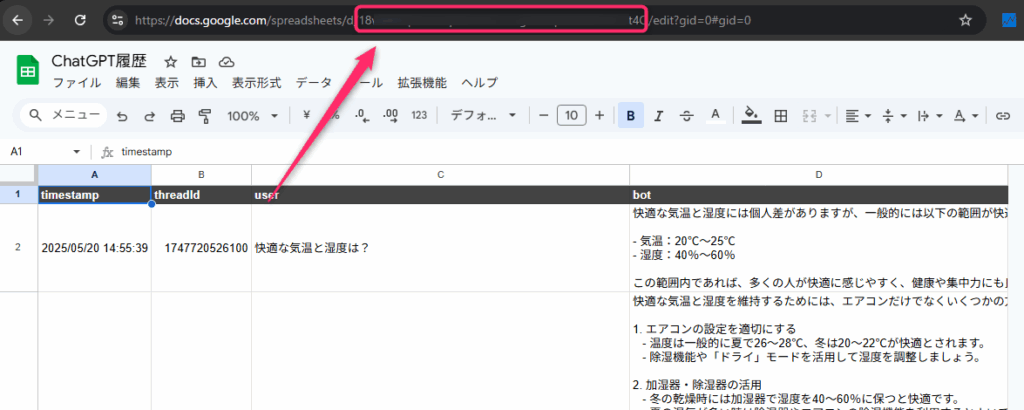
ログ用のスプレッドシートを作成
ログ用にスプレッドシートを作成します。
スプレッドシートのID(URLの一部分)とシート名を控えておきましょう。
※main.gsで記入します。
Webアプリの作成
あとはGASにコードを書いていくだけです。
| ファイル | 備考 |
|---|---|
| app.gs | HTML ファイルを 実際に表示可能なHTMLに変換します。 |
| index.html | HTMLを書いています。 |
| style.html | CSSを書いています。 |
| script.html | JavaScriptを書いています。 |
| main.gs | ChatGPTのAPIを使ったメインの機能を書いています。 |
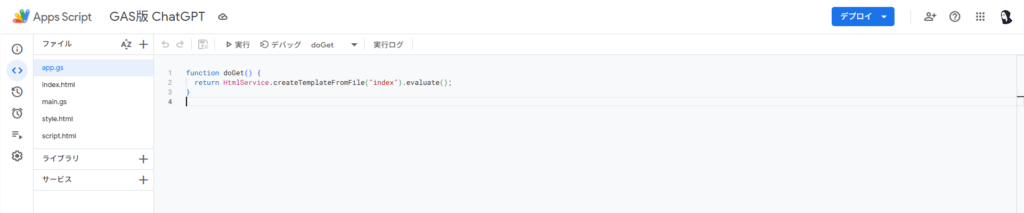
app.gs
デプロイした時にWebアプリとしてHTMLを表示するコードです。
function doGet() {
  return HtmlService.createTemplateFromFile("index").evaluate();
}
index.html
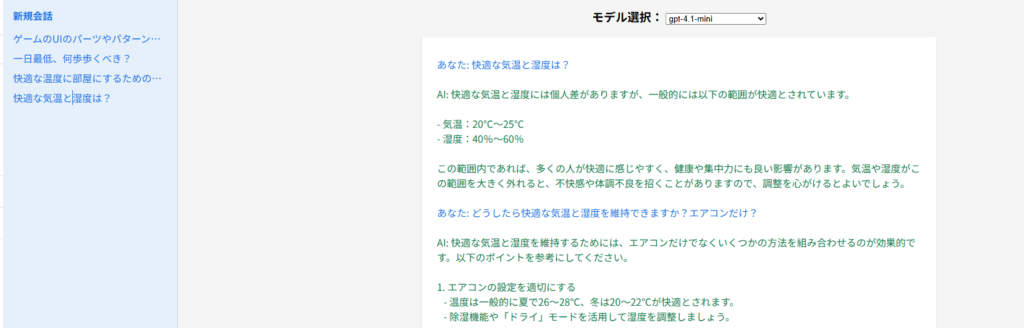
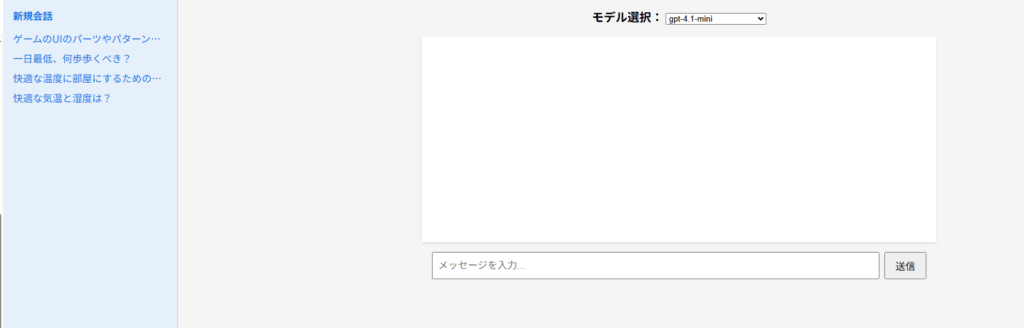
見た目です。
左にサイドバー、真ん中にメッセージを表示しています。
またCSSとJavascriptも参照できるようにしています。
<!DOCTYPE html>
<html>
  <head>
    <base target="_top">
    <?!= HtmlService.createHtmlOutputFromFile("style").getContent(); ?>
  </head>
  <body>
    <div class="sidebar">
      <h2 onclick="startNewConversation()">新規会話</h2>
      <div id="historyList"></div>
    </div>

    <div class="main">
      <div class="header">
        <label for="modelSelect">モデル選択:</label>
        <select id="modelSelect">
          <option value="gpt-4.1">gpt-4.1</option>
          <option value="gpt-4.1-mini" selected>gpt-4.1-mini</option>
          <option value="gpt-4.1-nano">gpt-4.1-nano</option>
          <option value="o4-mini">o4-mini</option>
          <option value="gpt-4o">gpt-4o</option>
          <option value="gpt-4o-mini">gpt-4o-mini</option>
          <option value="gpt-4o-realtime-preview">gpt-4o-realtime-preview</option>
          <option value="gpt-4o-mini-tts">gpt-4o-mini-tts</option>
        </select>
      </div>
      <div class="chat-box" id="chatLog"></div>
      <div class="input-area">
        <textarea id="inputText" rows="5" placeholder="メッセージを入力..."></textarea>
        <button onclick="sendMessage()">送信</button>
      </div>
    </div>
    <?!= HtmlService.createHtmlOutputFromFile("script").getContent(); ?>
  </body>
</html>
またプルダウンにChatGPTのモデルを選択できるようにしています。
モデルの種類は下記のURLから確認できます。
Style.html
CSS部分です。
<style>
  body {
    font-family: sans-serif;
    background-color: #f5f5f5;
    margin: 0;
    padding: 0;
    display: flex;
  }
  .sidebar {
    width: 250px;
    background-color: #e6f0fa;
    border-right: 1px solid #ccc;
    padding: 1em;
    height: 100vh;
    overflow-y: auto;
  }
  .sidebar h2 {
    font-size: 1em;
    margin-top: 0;
    cursor: pointer;
    color: #1a73e8;
  }
  .sidebar .history-item {
    margin: 0.5em 0;
    color: #1a73e8;
    cursor: pointer;
    white-space: nowrap;
    overflow: hidden;
    text-overflow: ellipsis;
  }
  .main {
    flex-grow: 1;
    display: flex;
    flex-direction: column;
    align-items: center;
    padding: 1em;
  }
  .header {
    font-size: 1.2em;
    font-weight: bold;
    margin-bottom: 1em;
  }
  .chat-box {
    width: 100%;
    max-width: 800px;
    background-color: #fff;
    padding: 1em;
    box-shadow: 0 2px 5px rgba(0,0,0,0.1);
    min-height: 300px;
    margin-bottom: 1em;
    overflow-y: auto;
  }
  .input-area {
    display: flex;
    width: 100%;
    max-width: 800px;
  }
  textarea#inputText {
    flex: 1;
    padding: 0.5em;
    font-size: 1em;
    resize: vertical;
  }
  button {
    padding: 0.5em 1em;
    margin-left: 0.5em;
    font-size: 1em;
  }
  .message {
    margin: 0.5em 0;
    padding: 0.5em;
  }
  .user {
    color: #1a73e8;
  }
  .bot {
    color: #0b8043;
    white-space: pre-wrap;
  }
</style>
あとはmain.gsとscript.htmlだけです。
最後にデプロイして、サイトが表示できます。
ここから有料になります。